If you’re looking for inspiration for building a large DIY entertainment center (also called a media center) for your home, see how I built the entertainment center of our dreams and how you can do it, too!
Here’s the short answer: I built a massive, 20-foot DIY entertainment center with built-in cabinets, open shelving, drawers for our DVD collection, and space for all our gaming and A/V equipment for about $1,100 total, roughly a tenth of what a carpenter would have charged for the same built-in.
Skill level: Advanced-Beginner to Intermediate
When I was designing our unfinished basement, which was so fun, I knew that I wanted to fill one of the walls with a massive, 20-foot DIY media center (also called an entertainment center) that could do lots of different things for our family.
We have a ton of boxes full of DVDs, games, gaming consoles, audio/visual components, and sports paraphernalia.
I knew that the basement would be the perfect place for all of it!
This media center would give us tons of display space and storage.
Planning Your DIY Entertainment Center Build
When planning your DIY media center project, consider how you will use it.
Will it be a combination of bookcase and TV console?
Will it be mostly for display or decorative items?
So you want to incorporate lighting?
Do you have a lot of media or gaming equipment?
How intricate or simple do you want it to look?
Do you want to stain or paint the wood? That will factor in the species of wood that you want to buy and affect the cost of your project.
We had set a budget to finish the basement, and we decided that I would be the general contractor for the whole project.
We decided that I could do the finish work myself, including building all the storage needed, and you can read more about my dream for the basement.
I knew I wanted this entertainment center to be built in, and to have someone build it for me was going to be $$$.
A few thoughts I had that made me decide to DIY the media center: the option of placing a small, basic, store-bought cabinet for the T.V. wasn’t going to be very impressive on that 20 x 9-foot wall.
And, I wanted to get new furniture for the room, so spending the whole budget on paying someone to build the entertainment center just didn’t make sense.
Oh, and….I am stubborn and tenacious. If I want something, I usually figure out how to get it, even if it means that I have to do it myself.
DIY entertainment center plans
Do you want to know the best thing about building an entertainment center (or anything) yourself?
You can build it in whatever dimensions you want, paint it whatever color you want, and design how YOU are going to use it!
Designing a Custom DIY Entertainment Center for Your Space
I thought carefully about what our needs were going to be in this space.
I knew that we would need:
- A space for the T.V. because that would be our movie-watching, football and family hang-out room.
- Cabinets for storage, because you can never have enough of that, and I wanted to hide all the things!
- Shelves. Shelves for days.
- Drawers for our extensive DVD collection.
- Space for all of the electronics.
Creating Your Plans for your DIY built-ins
I always have a project book to keep track of all of the projects I want to do and also keep all the information I need about a project in one place so I can find it easily.
Things like dimensions, so I don’t have to remeasure all the time because I misplaced the measurements I took the last time.
As well as paint colors I like for the project, a sketch or two, and a supplies list that seems to continue to grow as I go along.
So when planning, I measured and drew plans in my project book, looked at inspiration on Pinterest, and came up with an entertainment center plan that I fell in love with.
It was going to be perfect, and after doing the math, it would cost me a fraction of what I could hire someone for!

Materials and Tools Needed to Build a DIY Entertainment Center
Here’s a quick overview of the tools and supplies I used to build this DIY entertainment center, plus the categories you’ll want to shop for when building your own media center.
- Sheets of plywood (Birch, Oak, Radiata Pine, etc.) ripped down to your dimensions
- 2x4s for the base
- Brad nailer and brad nails
- Drill and drill bits
- Miter saw
- Table saw, circular saw, or track saw (Use this with a circular saw to make accurate cuts!)
- Countersinking wood screws
- Shelf pin-hole jig and shelf pins
- 1×2 and 1×3 premium pine or poplar boards for face frames and trim
- Pocket hole jig and pocket hole screws
- Crown moulding and simple trim for finishing
- Wood glue
- Palm sander and 220-grit sandpaper
- Router with Ogee bit (optional, but lovely for the countertop edge)
- Primer
- Cabinet/trim paint (I love Sherwin-Williams Emerald or Pro Classic)
Time-Saving Tip: Get Plywood Cut at Home Depot
Create a layout of how you want your wood cut for your media center. I draw this on paper by drawing rectangles to represent my plywood sheets and drawing lines in the rectangles to represent measurements of what size I want each section cut. Imagine a rectangle cut lengthwise into thirds or fifths for example.
Go to the pro desk at Home Depot and tell them you need some sheets of wood ripped down. They will only make LONG cuts.
Provide them with your layout of how you want your wood cut, and a photo on your phone of the pricing for the sheets of plywood that you want cut (ie: birch, radiata pine, etc). They will do it all at one time when they have a chance.
You can leave your cut list and then come back later to pick it up, sometimes even on the same day!
They will get the wood, take it to the saw, cut it all at once, and then it will be waiting by the door on a cart for you. It is fantastic!
How to Build a DIY Entertainment Center from Scratch
Step 1: Building the Base for Your DIY Entertainment Center
First, you will want to build a base for your media center cabinets to sit on. That is what the 2x4s will be used for. Pay attention to the popped-out area in my base. I wanted the center section to be deeper than the sides, so that is how I built my base.
You will also want to be sure that you make it the same height as your baseboard will be and 2″ more shallow than your cabinets if you want a toe-kick (for the base to be set back further than the front of the cabinets).
What is a toe-kick? Basically, it is when the cabinet is set back at the bottom so that when you stand next to it, your toes don’t hit the front of the cabinet. This is what you see in your kitchen because it is a functional space. I don’t want a toe-kick on my entertainment center, so I didn’t include this in my measurements.
If your cabinets will have a face frame, and you want everything to be flush to the floor instead of set back, make accommodations for that in your base dimensions.

I built my base out of leftover maple from the sheets that I ripped down on another project.
Ripping down a sheet of plywood means that I took a large 8′ x 4′ sheet of wood and cut it into the sizes that I needed for the shelves and cabinets with my saw.
Most of the time you will build a base out of inexpensive 2x4s. I just had this wood left over and used it instead of throwing it away.
Also, take note that I bumped out the center base a little because I wanted to make the center cabinet stick out for interest.
Step 2: Assembling the Cabinet Boxes
I also started to put the cabinets together using this jig. You can see that I took advantage of my painter being there and had him spray primer on the wood after I cut it all and before I put it together.
I wanted my shelves to be adjustable so I added shelf pin holes before I primed and sanded, but you could also add them once your cabinets are built OR fix your shelves while you’re building them (screw them in from the sides so they are stationary and don’t move).
Step 3: Priming and Prepping Your Wood
DO THIS STEP! Cut and prime all of your pieces before building them because once you prime, you will have to sand with 220-grit sandpaper and a palm sander. It is really difficult to get your sander back into the corners of your build.
Trust me on this. I know it is more fun to build, but it is much easier this way, and you will thank me for this tip!
Once the pieces are primed, you can sand them and wipe them down. Then, once you build your entertainment center, all you will have to do is caulk and paint!
You can see the paint all over the floor from priming the wood, but it was going to be covered with carpet, so…who cares?!
Step 4: Adding Face Frames to Your Built-In
Once the cabinets were built and screwed into the base and studs on the wall, I added face frames made of Poplar to each of them and then made the countertop. I built the face frames as I went along, one piece at a time. I would measure the front of the cabinets and add pieces of the 1×3″ poplar.
I used 1×3″ instead of 1×2 to give them more mass in between each cabinet.
I also used Poplar because it is a harder wood than Pine. Pine is soft and gets dented more easily.
Step 5: Creating a Custom Countertop
I used 3/4″ Birch for the counter and added a 1×2″ trim piece of Poplar along the front of the whole counter to make it more substantial.
Then I ran my router with an Ogee bit along the edge of the counter to give it a pretty edge and look a little more expensive and custom.
These are the little details that take a project from good to great!
I love having a router! I can do so many things with it, and it’s not scary at all!
Not going to lie, I kind of feel cool when I see what I can do with it. (I also made all of the window sills in the basement with my router.)

Step 6: Preparing the Wall for TV Mounting
When I had the basement framed, I had them install heavy plywood in the area where I knew the T.V. was going to be mounted. That way, no matter where the bracket for the T.V. would go within that space, it would have a good base to screw into. I had the electrician run the wires for the A/V and gaming equipment before the drywall and paint.
Once the drywall was up, I tucked them into the junction boxes so they don’t get covered with paint.
**TIP** We have 6 HDMI cords running through the wall. I labeled each end of each HDMI cord in the wall with a coordinating number so that I would know which device it was plugged into at the bottom and at the top.
Example: The HDMI cord for the speakers is #1. So I labeled both ends of the same HDMI cord #1 so that when I plugged #1 into the TV, I knew which cord was #1 at the bottom of the wall. The HDMI cord for the PlayStation is #2, etc. I labeled the top and bottom of the wires using my label maker and wrapping it around the wire, but you can use tape, too!

Step 7: Building and Installing Upper Bookcases
Time to move on to the upper shelving/bookcases.
As I was building them, I ran into issues beyond my control. For instance, one of the sides of one of the bookcases was warped. I didn’t notice it until I had cut, primed, and drilled all of the shelf pin holes (which felt like 1 million) and screwed it all together. I couldn’t get the bookcase box to be square no matter what I did.
So, I had to start all over, cut a new piece, and then go from there. It is frustrating, but these are the things that are out of your control when you are using natural elements like wood. You can see what happened in the craft room I built.
I used another jig to add the shelf pin holes so that my shelves could be adjustable. It was time-consuming, but I am so glad that I did it because now I have so much flexibility with the decor.
Once they were all built, I put them on top of the cabinet,s and I spaced apart the bookcases with a scrap 2×4 between the unit and the wall and then each other so that I could add a 1×3 face frame that was large enough to add some interest, and it would appear to be more massive in size.
Step 8: Adding Crown Molding and Finishing Touches
This DIY media center project came together beautifully, and here’s how you can do the same.
I took into consideration how big I wanted my crown molding and added a piece of MDF to the top of each bookcase to fill in the gap between the ceiling and the top of the bookcase. I mitered the corners to make it look well-finished, but you could butt the ends together if you want.

I added a shelf for the media equipment and gaming systems in the center cabinet. I cut the shelf and then used my pocket hole jig again to make pocket holes on the underside of the shelf to attach the shelf to the inside of the center cabinet.
In hindsight, I would have painted the interior of the opening and the shelf separately. Remember my tip above about painting it all first? I don’t know what I was thinking on this one.
It was a pain to paint the area with the shelf already installed. It took more time than I wanted to spend all because I didn’t prime first.
DIY Shiplap Accent Wall Behind the TV
Behind the TV, I decided to add shiplap for interest, but didn’t want to spend the money on real shiplap boards.
I purchased a sheet of 3/8 ” plywood and ripped it down into strips for my shiplap. I just wanted the effect of it, and our T.V. was going to be hung over it, so I didn’t need it to be too substantial. It was inexpensive and added a lot of texture and interest to the space.
Painting the DIY Entertainment Center
Once the unit was built, I hand-painted the entire thing! This was before I owned my favorite and inexpensive paint sprayer. It’s under $80 and worth every penny.
I used my favorite Emerald paint from Sherwin-Williams. It is made for cabinets and trim and looks beautiful in the end!
And, it is self-leveling – that means that it will fill in any small brush marks or roller marks by itself (as long as they are not too substantial) and hardens over time as it cures.


The Paint Color Everyone Asks About
The #1 question I get asked about this project is: “What paint color did you use?”
I painted the entire entertainment center in a custom color that I had mixed at Sherwin-Williams. I installed some cabinets in the bar area of our basement that were already finished in a specific color, so I wanted to continue the same color in this part of our basement so it would be cohesive. Below is the custom color I had mixed.
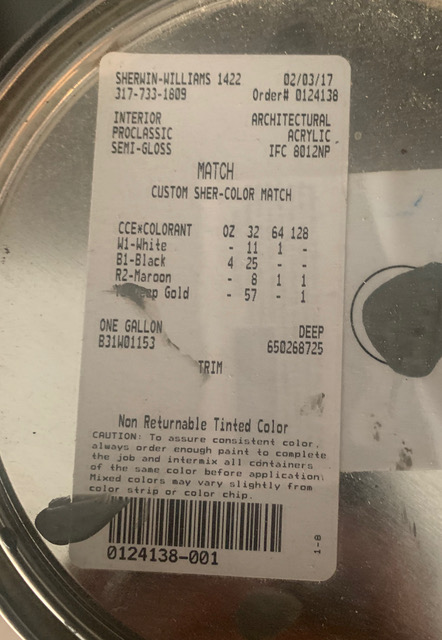
I used their Pro-Classic line in a satin finish. This paint is self-leveling and cures to a beautiful, durable finish that can handle all the wear and tear from daily use.
UPDATE** Since building this entertainment center, I have switched to using the EMERALD line from Sherwin-Williams. It is specifically made for cabinets and trim, and I love the finish it provides!
If you want a color similar to this that is already an existing color at Sherwin-Williams, the closest one would be Gauntlet Gray.
Pro tip: If you’re painting a large built-in like this, I highly recommend getting a sample first and painting it on a piece of scrap wood or posterboard.
Prop it up against your wall in the space and look at it throughout the day in different lighting. Paint looks SO different in each space depending on your lighting!
The color I chose works beautifully with the carpet and bar area and gives the whole space that custom, high-end look without breaking the bank.
Choosing Doors for Your Media Center
There are lots of tutorials on making doors out there, and I have made them before. But it was the dead of Winter so the simple answer is that I didn’t make them.
The doors and drawer fronts are the jewelry. Everyone sees them and notices them. For this project, and all of my other projects, I ordered the doors. Nice doors are what make your project go from nice to amazing!
I don’t have a planer or a real workshop, and they are cut with precision at the factory.
The company I use is so fast, and they are great to work with, so it is just easier to order them, and my time is better spent in other areas of my life. They aren’t too expensive and, since I don’t have a planer (to run the doors through to make them all the exact same thickness), they were able to make them faster and better than me….perfect!
I ordered them in unfinished maple. The painting I CAN DO, so I always have them sent to me unfinished instead of paying them to do it, and then I finish them.
It is very cost-effective, so if you are refinishing cabinets and just want to replace the doors, you might keep that in mind for your cabinets!
You can get them at my favorite place!

Drawer Solutions for Media Storage
This leads me to tell you about my drawers! I needed 6 drawers for all of our DVDs and any other media.
In my craft room, I made all of my drawers. It was summertime for that project, and it was fun to be outside. During this project, it was the dead of Winter in the Midwest and it is NOT fun to be outside!
Drawers aren’t hard and are rewarding to build, so if this were a summertime build, I would do it again.
This time I ordered them as well. They came quickly and are perfect!
The drawer pulls were on clearance at Williams-Sonoma, and I got them for $1.00/pull!

Budget-Friendly Hardware Ideas
I knew that I wanted the entertainment center hardware to tie into the aged brass sconces in the bar. I looked and looked but couldn’t find any that were what I wanted or the color for a reasonable amount of money.
So, I bought the drawer pulls on clearance, and the door handles from a local hardware store (both in satin nickel), and took my favorite spray paint to create what I wanted for a fraction of the cost.
8 handles + 6 drawer pulls + 1 can a spray paint = $56 for everything!
DIY Media Center Results and Cost

I am so incredibly proud of this entertainment center that I built all by myself. What an accomplishment! I go downstairs sometimes just to look at it and I am secretly surprised at myself (and I can’t help but smile and give myself a little pat on the back!).
And I told you I am tenacious.
DIY Entertainment Center Cost and Takeaways
Total Cost to Build a 20-Foot DIY Entertainment Center
The entire project cost around $1,100 to build this 20-foot entertainment center, including ordered doors and drawers that were prebuilt for me.
Do you know what a carpenter would have charged me?? At this time, in 2017, it would have cost me 12-15 times as much!
I can’t tell you how long it took me because I honestly don’t know!
I made the mistake of starting three HUGE projects at the same time and doing them myself, so they all took a really long time because I worked on them simultaneously.
Apologies to my family and thanks for their patience as the house was topsy-turvy for a while!
Why Building Your Own Entertainment Center is Worth It
Building this DIY entertainment center for my home and family gave me so many things in return, and I am incredibly proud of this entertainment center that I built all by myself!
I LOVE the way it turned out and am so in awe of what I accomplished!
I honed skills and learned new ones in the process.
I gave my family a beautiful place to put our things on display, saved a ton of money, and created an organizational opportunity within our home to keep it clear of clutter.
You have no idea the power you possess.
If you love built-in DIY cabinetry, you’ll want to check out my IKEA microwave cabinet hack, too!
Ready to Finish Your Basement? Start Here

Here is one of my most popular posts on the blog answering all the questions you may have about finishing your basement and probably some you never thought of!
See all the things you need to know before you finish your basement!
PLUS, you can download a checklist of all the steps to take when finishing a basement in the order they should go!
DIY Entertainment Center FAQs
How long does it take to build a DIY entertainment center?
Honestly, I can’t give you an exact timeline because I made the mistake of starting three huge projects at the same time! But if you’re focusing just on this project and working on weekends, I’d estimate 4-6 weekends for someone at an advanced-beginner to intermediate skill level. The time will vary based on the size of your media center and whether you’re ordering doors and drawers or making them yourself.
Can a beginner build a DIY entertainment center?
If you’re an advanced-beginner to intermediate DIYer, absolutely! This project does require some power tools and basic carpentry skills, but I broke down every step so you can follow along. The key is taking your time, measuring carefully, and not being afraid to ask questions at your local hardware store. If I can do it, you can too!
How much does it cost to build a DIY entertainment center?
My 20-foot DIY media center cost around $1,100 total, including ordered doors and drawers. A carpenter would have charged me thousands more! Your cost will depend on your dimensions, the type of wood you choose, and whether you make or order your doors and drawers. Budget-friendly tip: ordering unfinished doors and painting them yourself saves a ton of money.
Should I paint before or after assembling the cabinets?
Paint BEFORE! Trust me on this one. Cut and prime all of your pieces before building them. Once you prime, sand with 220-grit sandpaper, then build. It’s really difficult to get your sander into the corners once everything is assembled. Then once your media center is built, all you have to do is caulk and do your final paint coat!
Do I need special tools to build a DIY entertainment center?
You’ll need some basic power tools like a drill, miter saw, and either a table saw, circular saw, or track saw. A brad nailer, pocket hole jig, and palm sander are also really helpful. The good news? If you don’t own these, Home Depot will cut your plywood for you at the pro desk! You can also rent tools or borrow from friends to keep costs down.
What can I use instead of an entertainment center?
If you don’t want a built-in, you have options: a media console or TV stand, a wall-mounted floating shelf system, an armoire or wardrobe repurposed for storage, or an open bookcase styled around the TV. I chose a built-in DIY entertainment center because it gave us far more storage and a custom look for about the same cost as a nice store-bought console.
What is the cheapest way to build a media wall?
The cheapest way to build a media wall is to skip custom cabinetry and use inexpensive 2x4s and MDF or plywood for a simple floating shelf and TV surround, then paint it to match your walls. Ordering unfinished doors and drawer fronts instead of custom ones, using Home Depot’s pro desk to rip plywood for free, and choosing paint grade wood over hardwood are the biggest ways I kept my own build’s cost down to $1,100.
While you may look at building this massive media center all by myself and think that I am crazy, I still hope that you are inspired to do something amazing!
It doesn’t matter how large or small. Whether you believe you can or believe you can’t, you’re probably right!

Disclosure: This post may contain affiliate links, meaning I get a (very) small commission if you decide to make a purchase through my links, at no cost to you. As a Lowe’s Partner I earn from qualifying purchases. Thank you for your support!
Hello, this looks amazing. I want to do something similar in our media room. I was wondering how you attached the bookshelves to the wall and also if you attached the countertops together in any way? Or if you just caulked the gaps? Thanks!
Hi, Tyler! I attached the bookcases to the wall by adding a piece of 3″x3/4″ wood across the top of the inside of the bookcase (where the sides and top of the bookcase meet) by attaching it with screws going in from the outside of the bookcase into the piece of wood and then attaching that to the studs in the wall behind each bookcase. Also, I attached the wood countertops to the bases by using wood glue and brad nails. I intentionally made the seams where the bookcases met so they could easily be caulked. Any showing seams were filled with Bondo and sanded smooth before priming/painting. The fronts of the counters are finished with 1×2″ pieces of poplar that I ran through my router bit with a decorative edge. I hope that helps!! Happy Building!
These turn out beautifully!! Love the color. Congratulations on a job well done!
Thank you so much, Libbie! Such an impactful project making such a difference in my space. 🙂
Hi! I was wondering if you have a new favorite place you would order doors from? I think the place you linked has closed? The link didn’t work when I tried it.
Thanks!
Hi, Mandi!
Thank you for letting me know! I guess they closed but I had no idea. I would go with cabinetdoorstore.com! Good luck on your project!!
I love the paint color… Could you please share with me the formula for the paint? Thank you so very much.
Hi, Melaina! I just sent you an email with the custom formula. ~April
Love this- we’re planning on doing something similar and I would love to know the color you used, would you mind sending?? TY!
Hi, Amanda! I just sent you an email with the formula! Have a great day!
This is stunning. I have been pricing a built-in corner entertainment center/wall shelves unit and it is SO EXPENSIVE!!! What I want is big…but still. 5 years ago I built a house (we built a quonset hut and put a house in it), I was the contractor, I screwed countless metal arches together for the crew I hired to erect, I did the closet shelving, concrete kitchen counters, installed most of the windows, one son and I painted everything, another son helped with some trim while I did the rest and my daughters in law helped paint, and more I can’t remember as it is now a blur. But I am 63 now and just not up to building something big again. I am surfing the internet for cabinets today and that is why I saw your gorgeous wall unit. You did a great job. I also really like your whole site. You are very generous with your readers.
Hi, Victoria! Wow, that was a lot of work you did! It sounds amazing 🙂 Thank you for your generous comment, I really appreciate it. It was very sweet and I am so glad you love the blog. I pour my heart into it so hearing how much you love it really makes my heart happy.
She does it again!!!! I am LOVING this transformation! Nick and I are tackling our living room entertainment center this summer so I’m sure you’ll be hearing from me 😂 Also love your color choice! Do you mind sharing??
Thank you, Katie! This will be such a fun project for you both!! It is so fun to hear of your upcoming projects. I will send you an email with my exact color formula so be watching your inbox. 🙂
I love the way your entertainment center turned out! I am refinishing an old entertainment center and would like to know the custom color you used. I would also like to know the name of the company you use to purchase doors.
Awww, thank you so much, Donna! I purchased them from cabinet door world. I have ordered all of my doors from them, their customer service has always been great to deal with and they are very accommodating if you call with questions or concerns. I will email you the paint formula!
Looks great. I’m attempting to copy yours. Please share the paint color and how you attached shelves to the wall.
Hi, Steve! Thank you so much. We absolutely love it. I just sent you an email with the color recipe and also all the details on how I attached the bookcases to the wall. All the best on your project!
This looks absolutely perfect!! I have a space in my living room that i’ve been wanting something like this for, i’ve been searching for a few months now — even the color looks perfect. I would love to get the color mix info as well (i see you’ve commented to other posts about emailing them the color info — if you still have it on hand and it’s not an inconvenience, it’d be greatly appreciated). You’ve done such an amazing job with this project, i’m so excited i stumbled across your page. =) PS: Happy New Year 2024!
Hi, Angelita!
Thank you so much for the love on this project! It really changes the space and I couldn’t be happier with it. I would be happy to share the color with you and I will send an email. Happy New Year to you!!
Hello! This is a stunning piece, very well done!! Could you please e-mail me the paint color used as well? Thank you!
Hi, Nikki!
Thank you so much!! I just tried to send the formula to your email, but it came back as undeliverable.
Hello! I am looking to do a built in myself and looking how yours turned out I just feel overwhelmed, yours is so wonderful! Could I also get the paint color you used and when you ordered the cabinet doors did you choose the maple with paintable MDF? Thank you so much!!
Hi, Tara! Sorry for the late response! My site has been down and I have had to do some major troubleshooting with my host. Thank you for the kind words! That is so awesome that you want to tackle this project yourself! You can do it!! It can be overwhelming but just break it down into small projects and it will take some of the overwhelm out. I will send you the paint color in an email shortly. It was custom so I will send you the breakdown of the formula.
Hello! Beautiful wall entertainment center that you built.
Could you please send me the paint color as well? It looks grey in the pics. I saw a comment that someone said it also has a green undertone?
Hi, Ashton! Thank you so much!! The color is a custom mix I had done. It can look gray in certain light. But in my basement, because of the lighting down there, it has a green hue to it. I just emailed you the color code in case you want to get a sample at your local store.
Hi! Would love to know the color! Is it like a green- can’t see it right if it’s green or greyish??? Would appreciate it!
Hi, Nydia! I had the color matched to my bar cabinets. I will email you the color coding from Sherwin Williams. It is a tricky color. The light changes it from a gray to a gray-green depending on the light source, so the color will really depend on the lighting in your space. Because this is a basement we rely on mostly interior lighting.
Hello,
I love this entertainment center and want to do something similar. I understand most of the plans but am unsure of how you are doing the face frame on the sides of the book shelves closest to the TV. Is there a second sheet of plywood? What size face frame is being used?
Also would love to know the color as well.
Thanks!
Hi, Tom. Thank you so much! I love it, too! I see what you’re saying. On the sides of each bookcase that are nearest to the shiplap, I just added a 1×2 frame around the whole thing (laying the 1×2 flat against the side panel) and then a smaller decorative trim inside the 1×2 frame to finish the look. The 1×2 frame on the side panel was enough bulk to be able to add the face frame to the front of the bookcases. I hope that helps!
The color is so pretty!! I just emailed you the color…it is custom.
Do you have a material list?
Hi, Morgan! I don’t have a materials list because the project was so custom. But if you have a question just ask me here or feel free to email me!
Hi, we want to do something very similar and like others would love to know what paint you used. Could you send that to us?
Please and thanks,
Hi! I just sent you an email with all of the details on the paint and can’t wait to see it complete! Happy Painting!!
I love the color you used for this project. I’ve tried to match the color just based on your photographs but haven’t been successful. Do you still happen to have the paint cans with the barcode for the custom color on them. If so, could you send me a photo? Thank you!
Hi, Kim!
I just sent you the color to your email. Enjoy!
The build turned out awesome!!! I also really love that color and was wondering if you wouldn’t mind sending my the paint color as well? Thank you so much
HI, Jason! Thank you so much! I just emailed it to you and hope you enjoy your next project!
What is the color of the entertainment center and walls? Looks Great!
Thank you!! I am sorry I am just seeing this now. The color is a custom color that I had color matched to a different cabinet I have. I had it mixed at Sherwin Williams.