Waterproofing a tile shower isn’t that bad. If you have a weekend to give to your new or remodeled shower, you can waterproof it and get it ready for your tile by the time the new week begins. I have prepared two showers for tile and in this post, I am sharing the method I chose for both, why, and how I did it all in a weekend by myself!
When beginning a project I always ask myself, “What is the worst that can happen?” and I always believe I can do something. Even if I don’t know how I will try.
Sometimes it turns out to be harder than I thought and even though this is messy, oh so messy, it turns out that it isn’t that hard.
It is just like wallpapering a wall!
What does waterproofing a tile shower even mean?
Waterproofing a shower is just what it sounds like. It prevents leaks and mold growth by keeping water off of the actual wall behind it.
You do this with a waterproof membrane that is either painted on or installed using a special paper that is applied with mortar. A waterproof membrane acts as a water/moisture barrier that sits between the walls and the tiles of your shower or bath.


Do I need to waterproof the shower walls before tiling?
That depends. I always say to err on the side of caution. Water can creep through the tile joints and cause damage to the walls behind the tiles. If you have cement board you may not need to do this. Cement board is water-durable but not waterproof.
I might opt to tile directly over cement board if I were doing a kids’ bathroom where there was a tub and minimal water would be hitting the shower walls daily.
However, for a walk-in shower, I would do a membrane over cement board due to the way water constantly hits the walls leaving the potential for mold.
I have the purple drywall, or gypsum, in my shower surround instead of regular drywall or cement board. Unlike standard drywall, PURPLE XP Drywall is moisture, mold- and mildew-resistant. But it is not waterproof. That is why I used a membrane application to waterproof it.
What is the best way to waterproof a tile shower?
A waterproof membrane is a thick paper that feels almost like a thin rubber. For me, since this is our home that we don’t plan to move from, using a membrane paper method (that you apply with mortar) is the best way to waterproof your shower for longevity.
I wanted to ensure no water would leak out and no mold could grow on the walls. The rooms on either side of the bathroom are bedrooms and both have cabinets on the walls that back up to the shower. I wanted to be sure that there would be no opportunity for water to leak out underneath the cabinets and get into the carpet.
What is the cheapest way to waterproof a tile shower?
Cheap doesn’t mean it is a good idea. A lot of people choose a paintable liquid membrane due to the cost, time, ease, and longevity of owning their home.
People who are flipping a house, for instance, will choose this method because they are keeping costs low, it is very easy to do, and they will be turning over the property in a shorter amount of time than a home they would be living in for the longer term.
If you do choose to do a painted membrane, consider only doing it over cement board in a shower that has a tub at the bottom rather than a tile bed.
What shower waterproof membrane should I buy?
When I did my first shower I used a kit that included everything I needed. It went so well and it was easy enough that I opted to use it again in our new house when I finished our basement.
This is the kit I ordered. A Schluter-Kerdi shower kit is an all-inclusive installation package that contains all of the components needed to create a maintenance-free, watertight shower. It also comes with a waterproof shower pan size that can be customized. I got the 38″ x 60″ kit.
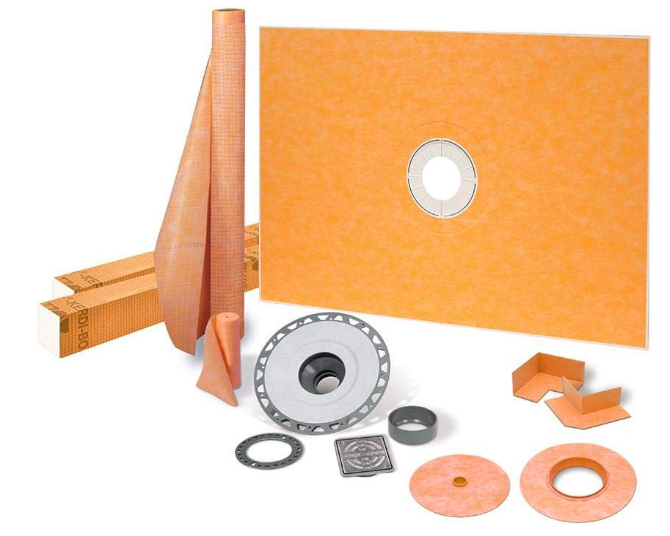
They offer a lot of different sizes and pieces in a kit so all kits are not created equal. Spend some time to figure out what you really want the end result to be in your shower. They make components to install a heated floor in your bathroom, walk-in showers with no curb, long rectangular drains, etc. There are so many options!
In addition to the kits, they offer the pieces “a la carte” so you don’t have to order the whole kit if you don’t need to.
Before you order the size kit you need, don’t forget to check your local building codes for the required distance between the toilet and the edge of the shower pan/side of the shower. Yes, there is a required distance. All information is online.
When shopping for the correct kit for your shower, the size referred to for the kit refers to the size of the shower pan for the floor of the shower. So pay attention to the dimensions.
What is included in a Schluter-Kerdi Kit?
Included in the kit I bought are all the items I would need to waterproof all of the areas of the shower: A valve seal to waterproof the opening of the shower turn-on valve, a pipe seal to cover the shower head pipe opening, 4 inside corners and 2 outside corners for the shower pan, all the rolls of the membrane I need (the long strips you put on the walls), drain pipe, drain cover, shower curb, and a shower pan.
Remember, the size of the kit refers to the length and depth of your shower pan.
I bought a 38″ x 60″ because that is the end size of my shower (after checking our local building code). If you need to customize the shower pan, you can cut it down easily to whatever size you need with any type of saw. It is made out of thick styrofoam.
If you want to install a place to put your shampoo bottles check out how I installed a shower niche!
Supplies needed to apply waterproofing membrane
- Unmodified thinset mortar
- Corded drill (if mixing the mortar and grout)
- Drill attachment mixer (if mixing yourself)
- Bucket
- Trowel
- Wide Putty knife
- Level
- Tape measure
- Pen/pencil
- Scissors
- Large piece of cardboard to cover your drain and pan
The first place to start (and really important) is to make sure you have the correct mortar for the membrane strips to adhere to the wall. The correct kind is an unmodified thinset mortar. You can use the one directly made by Schluter.
You will need to use a trowel to apply the mortar directly to the wall, just like you would with tile. The membrane sheets will lay over the mortar. There is a specific kind of mortar that you need to use so read the instructions for your kit.
Side note: there is also a special mortar you need to use with this membrane paper to apply tiles to so be sure to read thoroughly.
$$ SAVING TIP* – Schluter does offer a premixed mortar, but I bought a generic mortar that you have to mix with water. It is really easy and way less expensive than the premixed one. Follow the directions on the back of the bag and you can’t mess it up.

You will want to get this attachment for your drill to mix your mortar. You can use it for your thin-set for your tile and grout if you don’t buy premixed. I have continued to use it for SO many other projects so it is worth the few dollars for sure.
Also, using a corded drill (one you plug into the wall) vs. a cordless drill is better and won’t die in the middle of mixing. That is very frustrating and can affect the consistency of your mortar if you stop before it is fully mixed.
This plug-in drill is a cheap option. It is good to have on hand and has good reviews! I have one just for these little projects.
Steps to install a waterproofing membrane to a tile shower
- First I measured out the membrane (large orange rolls in the kit that are thick and waterproof) and cut strips to the length I needed them to be. Cutting them all the same before I started was a time/sanity saver.
- Before you begin with the mortar, be sure to cover your drain! You can use a piece of cardboard, etc, or even tape. You don’t want the mortar to go in the drain and cause you trouble down the road. I laid a box top over the drain and then laid a flat piece of large cardboard over that to keep as much mortar off the pan as possible.
- I used a level to make a straight line on the wall along the outside edge of the shower from the floor to the ceiling where the edge of the shower tile would stop on BOTH sides of the shower. That helped keep my pieces straight and also to not have excess membrane on the outside of the shower space. The membrane also comes with a grid pattern on them to help keep everything level.
- I mixed the mortar with water and my drill mixer according to directions then I started on the right side, installing the membrane counter-clockwise around the shower. Using a trowel, I added the mortar to the wall beginning at the level line I drew and smoothed it over the surface the width and height of the first piece of membrane. I did not add the membrane all the way to the top of the 9′ wall. I stopped at about 8′ because we are not giants and the chances of water going up to those tiles were very minimal.

- Then I added my first piece of membrane to the mortar. It is kind of like wallpapering. I pushed out any excess mortar and air to the edges to make the surface nice and smooth with a wide putty knife. Remember….the tile will be going on top of the membrane so you don’t want any bumps!
- Once that was installed I moved onto the next piece and overlapped that piece 2″ to 3″ over the edge of the last piece. The grid lines on the membrane help keep it straight for this as well. One by one I moved around the shower, spreading on mortar and installing each piece I had cut.
- When I got to where the tile would end on the other side of the shower I knew it because I had already drawn a plumb line (level vertical line). I measured the distance from the last piece of membrane to the line, added 3″ to that for overlap, and cut the last piece of membrane down to fit the width. Again, the grid lines came in handy!
- Then I lined up the last piece of membrane with the level line I drew in the beginning and then overlapped the previous piece I installed. The ends/outside edges of the membrane are now nice and straight. For reference, this is where the tile will end.
Waterproofing a tile shower pan
It was time to move on to adding the shower pan.
The pan I chose comes in one solid piece and has a drain in the center.
When I did a dry run to make sure it fit, I realized I had to cut down the depth of the pan because once I added the curb to it, the distance between the toilet and the shower curb was not enough to meet our local building code.
So I cut the pan down by measuring in 1.5″ from the long edge and running my multi-tool along the long side cut it to make it fit and to be sure I could meet code standards.

Turn your shower pan into a custom shower base
The pan is made out of hard styrofoam which makes it easy to cut with any saw or hand tool and is angled slightly for water to flow towards the drain so you don’t need to do anything extra. Once installed and waterproofed around the edges, the foam can be tiled over. This is my favorite option for a shower pan because of its ease.
Once I trimmed it all down to the right size, I used a trowel to add mortar to the cement floor and laid my pan piece on top of that.
For the curb, I had to shave a little off the length as well, but that was no big deal because it is also made of styrofoam and was easy to cut as well. You could also cut it with a hand saw, but it is a lot thicker than the pan. It is like a big 6″ x 4″ x 60″ thick block.

**Tip** Buy the kit (size of the shower pan) bigger than your dimensions if they don’t offer the exact length you need. Then you can cut it down with any kind of saw – jig saw, hand saw, the multi-tool I used, etc. It cuts easily. Don’t worry if you don’t cut it perfectly. You will be adding strips of waterproof membrane to cover any gaps when you put it together. Then you can tile with whatever custom design you like!
Earlier I had installed a prefab shower niche that just needed to be waterproofed like the rest of the shower. You can read all about installing a shower niche in another post in this bathroom series.

I then took the included small membrane roll and cut it into strips to add to the edges where the pan meets the shower wall. I followed installation directions to apply them to the shampoo niche and all of the interior and exterior corners of the pan and curb as well.

The tile will go over everything in orange (and then up to the ceiling, but I didn’t need to add more waterproofing to that high section). By overlapping all the pieces 3″ all the way around as you go you ensure a tight bond. No water can leak through underneath the tile once it is installed over this membrane leaving your shower mold free.

]
You can find all of the techniques and installation videos for the different kinds of kits and shower floors with the different options on the Schluter website. It is really thorough and really helpful!
And it turns out waterproofing the shower was surprisingly easy! Messy. Really, really messy. But not too advanced of a task.
Stay tuned for the installation of the drain. Oh, the drain. I learned a very important $4 trick and am so happy I took the time to do it! Otherwise, water would have been everywhere!
Missed the journey so far? See the introduction to finishing a basement bathroom, the design vision I had before it even began, planning for the cost of finishing an unfinished basement bathroom and installing a shower niche.

Disclosure: This post may contain affiliate links, meaning I get a (very) small commission if you decide to make a purchase through my links, at no cost to you. As a Lowe’s Partner I earn from qualifying purchases. Thank you for your support!
Leave a Reply