In this post, I am sharing how I was able to install patterned bathroom floor tiles easily, from start to finish, in a weekend, using just a few simple tools. The cuts were not hard and the installation was straightforward. I was able to add a touch of whimsy and life to an otherwise dark, boring corner of our basement. Read on to see how easy this project really was and how you can do it, too!
Patterned bathroom floor tiles are like tiny storytellers, infusing charm into the space they inhabit. Each design introduces a narrative of personality and style. These tiles are not just mere flooring, they become the heartbeat of a space, injecting it with character.
Each tile boasts its own unique design and when you pair it with another, and another, you get a beautiful story. From the simplicity of geometric shapes to intricate floral motifs, these tiles are the embodiment of creativity.
They breathe life into the space, adding depth and dimension to even the simplest of rooms. Patterned bathroom floor tiles aren’t just decor; they become the focal point of the space so we must choose them carefully. With every step, patterned bathroom floor tiles have the magical ability to transform even the simplest of spaces.


What makes installing patterned bathroom floor tiles one of those relatively easy projects, especially in a basement, is that those particular rooms are typically a small rectangle, or square and don’t require a lot of fancy cuts. My favorite kind of floor tile is one where the patterns connect and create a full design when the corners touch, bringing life to a space.
Choosing the right patterned bathroom floor tiles
When shopping for tile you might begin the journey extremely excited! Only to be set back and completely overwhelmed and then get kind of scared because, let’s face it, there are too many choices!
My advice is to go to the tile shop knowing what you want the space to feel like and the color palette you want to use in your room, as well as who will be using the space, at the top of your mind. Do you want it to be neutral or a pop of color? Do you want it dark or light?
Check out Pinterest and start a board of your favorites to refer to while tile shopping. This will help keep you focused on what you are there for and keep you from having butterfly moments!
I found some amazing choices to give you a jumping-off point and narrow them down for you so check out these 15 patterned floor tiles that I think you will love! There is something for everyone on this list.
How I chose my patterned floor tiles
Adding a bathroom to our basement was in the plans when I finished it. I didn’t want the room to look like it was an afterthought to the home so I picked classic, timeless tiles for the space.
I knew that this bathroom would be generally used by two teenagers and also the occasional guest. I also knew I didn’t want it to be too busy, but didn’t want it to be washed out.
When I saw this faux hand-painted porcelain tile at Lowe’s I immediately fell in love and the price was good! I wanted to fill my cart, go straight to the checkout line, and start my project that day!
But I had to wait as they are only available online so I ordered them and only had to wait a few days for them to arrive. (I bought a few too many tiles just in case I needed them and when I didn’t, Lowe’s customer service is great to deal with and I returned them with no problem.)
I opted for this particular tile because I loved the simplicity of it. I knew that it would stand up to the kids stepping all over it, it would be easy to maintain, wouldn’t show dirt easily because it was dark, and it would be easy to install.
Patterned tiles come in different sizes and shapes. Mine are square and 8″x8″, but I also have hex-shaped marble tiles in small 2″x2″ tiles that came on a 12″x12″ mesh sheet.

Patterned bathroom floor tiles aren’t just for the floor!

You can use them anywhere in your bathroom. Use them in the shower as a featured detail for added interest and to compliment your wall tile. Use them in your shower niche for a pop of color. Tile the wall behind the vanity, a bathtub, or if the toilet sits in an area by itself, tile the wall behind it!
I wouldn’t choose to do an entire bathroom shower in a patterned tile because I feel it is too busy, even though I have seen it be done. The whole idea of patterned tile is to add interest to a space, not overwhelm it.
Remember a little pattern goes a long way.
I thought about using the flower tile in the shower niche as an added little pop of interest to the otherwise white space. But I didn’t do this because I just wanted the shower to be light and bright in this small basement bathroom. My luxury vinyl floors are on the darker side and it is installed right up to the dark gray patterned bathroom floor tiles I chose so I didn’t want any additional dark color in the space.
Although, that would have looked so nice!
What if my bathroom floor isn’t level?
Be sure your floors are level before you start to ensure a level and easy installation of your patterned bathroom floor tiles.
You may find that you need to level your floor but you can do this yourself!
If you are in a basement on cement, you can check this by laying a stud or board across the floor. If you see any dips in your floor, go ahead and level that out.
I didn’t have to do this, but according to a This Old House article, the easiest way is to use a self-leveling compound, also called liquid floor underlayment or floor resurfacer. The material flows out like thick syrup, then hardens into a smooth, perfectly level surface, sometimes in less than an hour.
If you had to move pipes in a basement and you backfill, then you want to be sure it is level when you repair it.
If you’re not installing over cement and your wood subfloor is not level, you can also use this self-leveling compound.
Where should I start my tile pattern?
When you are using patterned bathroom floor tiles it is best to start from the middle of the space and work your way out.
You can find the midpoint and start from there. Measure across the width and mark the center, then measure across the length and mark the center. Where those two points meet is the center of your space.
Drawing a grid on the floor may help you keep it all straight.
You will want to do this measuring after the shower pan is installed, but before the toilet and vanity are in place.
If 4 tiles meet at the corners to create one design (like mine make a flower) then start each of the corners at the midpoint so they touch the middle of the space.
After measuring and finding the middle of your space, do a dry run of your tiles. Lay them all out on the floor before you add the mortar and begin tiling to make sure you love the starting and end points of your pattern and to make sure you have enough for your project.
Doing this will ensure that you know exactly what to expect and there will most likely be no surprises.
There is nothing worse than running out of something during an installation!
I got really lucky and was able to lay them in full pattern from the doorway to the shower pan. For added whimsy, I wanted to continue the pattern up the shower pan so you would see the pretty faux hand-painted flowers down the hallway. I love the way it turned out!

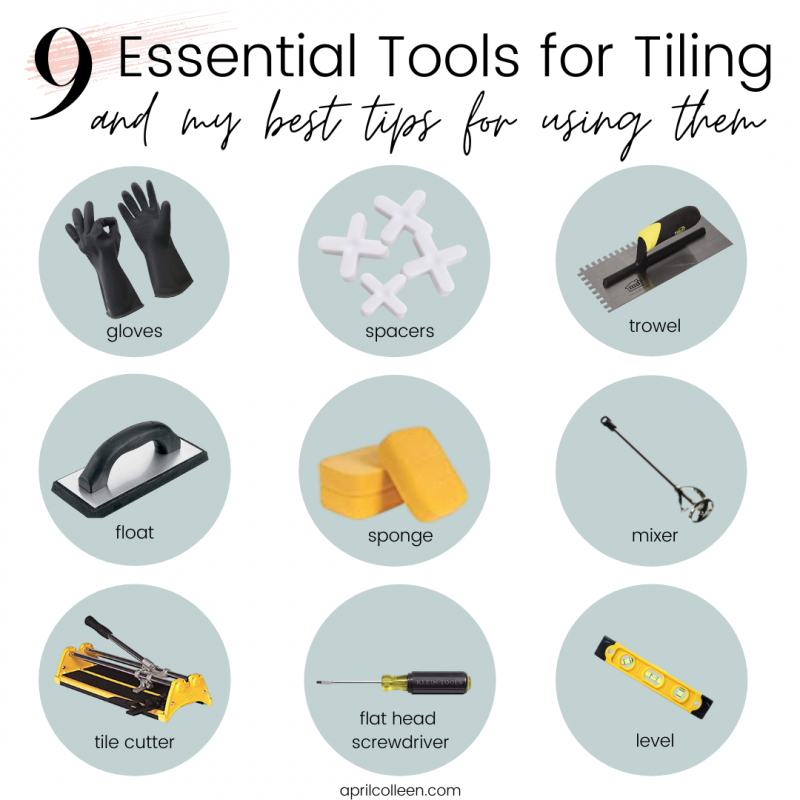
List of supplies needed to install patterned bathroom floor tiles
- level
- mortar
- grout
- tile
- heavy duty gloves
- trowel (the bag or container of mortar will tell you what size notches to use on your trowel ex: 1/4″, 5/8″, etc.)
- float
- tile spacers (I recommend leveling spacers)
- Tile saw
(If you click on the photo it will take you to my post telling you all about 9 Essential Tools you need for Tiling Anything!)
How do you lay patterned bathroom tile floors?
My husband would joke and say “Very carefully”. HA!
All joking aside, you lay them just like you do any other tiles. They are actually easier than others because the plane is horizontal (floor), so the weight of the tile keeps them in place, and you don’t have to worry about them falling off of a vertical plane (wall).
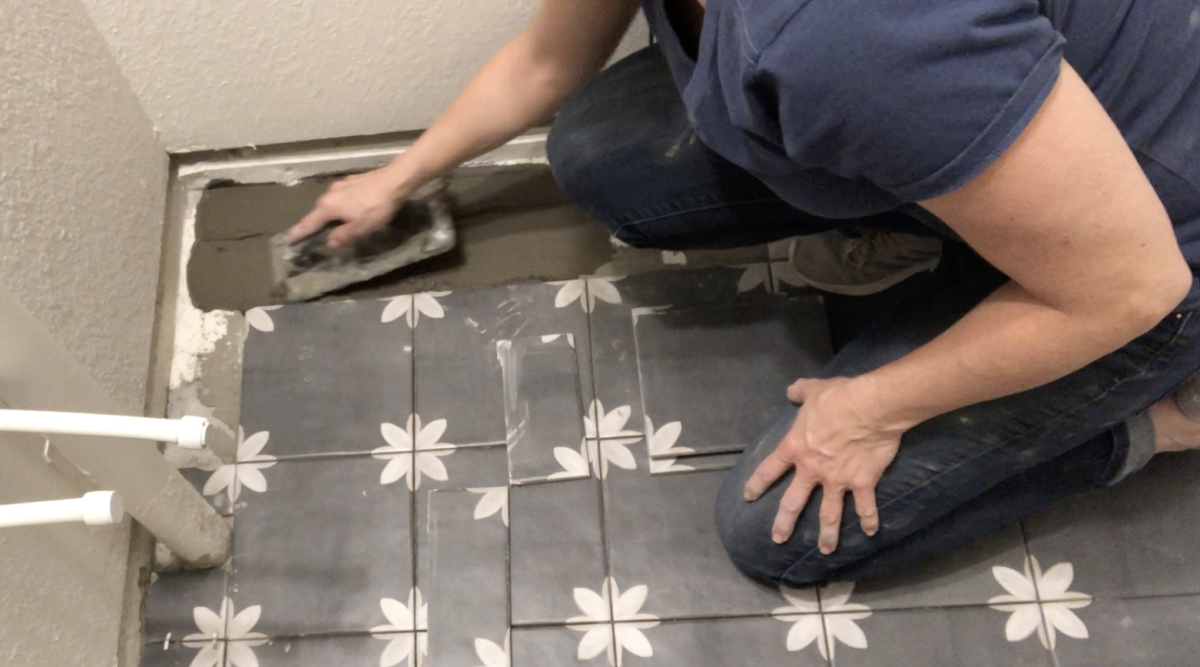
- Figure out where you will start your pattern and make sure it is straight in line with the walls on either side. It may help you to draw a grid or a cross on the floor to help begin a straight installation.
- Lay the mortar on the floor and use the trowel to drag the notches through the mortar.
- Add a thin layer of mortar on the back of your tile (called “back-buttering”) and pull the trowel notches through it.
- Lay your tile on top of the floor with the mortar on it and continue through the room. “Back-buttering” helps create a tighter bond.
How to cut floor tile around a toilet with a tile saw
I did have to cut around my toilet drain in the floor.
I had to cut three tiles that needed to be cut around the drain.
To figure out where to cut I laid the three tiles in place over the drain and spaced them from each other and the other tiles around them with the tile spacers. Then I traced where the drain was on the tiles with a Sharpie.
I used my power tile saw to cut the parts of the circle that needed to be cut by moving the tile into the blade on the tile saw, and back out, until I achieved the rounded cutouts I needed. You can practice this on scrap tile if you need to.
Remember, your toilet will go over this area so get as close as you can, but nobody will ever see this part so there is room for error.
Mine turned out pretty good!

You can view more of the entire bathroom project in my basement bathroom series. If you have any questions, feel free to message me by email or leave a comment!
Stay tuned for my next post all about the exciting world of choosing the right toilet for your space. (As I try to say that with a straight face.)
I promised you the entire series, so here we are!
Go ahead! Do it yourself. But let’s do it TOGETHER!
Have a blessed day! 
Disclosure: This post may contain affiliate links, meaning I get a (very) small commission if you decide to make a purchase through my links, at no cost to you. As a Lowe’s Partner I earn from qualifying purchases. Thank you for your support!
Great real-world walkthrough that shows patterned bathroom tile installation is totally doable in a weekend. The step-by-step approach and practical tips make it relatable and inspiring for DIYers tackling a similar project.
Great accomplishment! Installing patterned bathroom floor tiles in a weekend takes careful planning, precise layout, and patience. Laying out the pattern first, cutting accurately, and checking levels along the way ensures a professional-looking finish—even in a short time frame.